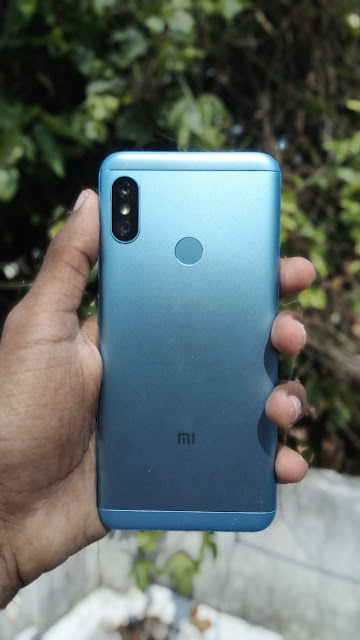
Redmi 6 Pro(Mi A2 Lite) Full Review After Using For Two Months

December 30, 2018 Evil Kannevil 0 Comments

Redmi 6 Pro Mi A2 Lite images review

Redmi 6 pro was launched in India in September 11, 2018. On its launch date it was the first phone in the Redmi series to have a notch. The price of the phone at its launch date was ₹ 11,499.00 for its 3 GB,32 GB variant and ₹ 13,499.00 for its 4 GB,64 GB variant on retail stores. Actually this phone is the lite version Mi A2 and it's launched out of India with its name as Mi A2 Lite. The only difference between Mi A2 Lite and Redmi 6 Pro is Mi A2 Lite has stock android but Redmi 6 Pro has its own MIUI .

Redmi 6 Pro Mi, A2 Lite images review

There is no notable difference on the back of the phone than its predecessors.
It has its usual metal back body with plastic at top and bottom. Its look pretty decent.

Redmi 6 Pro, Mi A2 Lite images review

While going to the front its has a notch with 14.8cm (5.84) FHD+ display. A notch isn't a big deal today. When compared to its competitors its display is small but its makes the phone compact and easy for one handed use. A noticeable con here is it has a large chin.

Now let's talk about specs:
[Source MI India]

Camera : 12+5 MP AI dual camera with 1.25μm pixels

Its camera is the best in outdoor but its working in indoor is average. 
I will put some sample images at the end

Screen: 14.8cm (5.84) FHD+ display with 19.9 aspect ratio 

Battery: 4000mAh 

This battery is awesome it can run for 2+ Days for a single charge for normal users and its last for a whole day for hardcore user like me. 

Processor: Qualcomm snapdragon 625 manufactured in a 14nm technology, Adreno 506 graphics processing unit

Even Though it is a two year old processor it is efficient in its performance and its battery life. I test many games like Asphalt 9 Legends, Modern combat 5 etc. Every thing worked flawlessly. 

Software: Android 8.1 with MIUI 10 
It's not officially confirmed but their are chances for this device to get the android pie update. Personally I like the MIUI very much because it is smooth its has very useful features like reading mode, Built-in screen recorder also its theme can be customised easily .If you are not a big fan of stock android experience then MIUI is the best UI 
Sim slot: Dedicated Dual nano sim slots+  SD card slot  
Unlike Hybrid dedicated slots allows u to use 2 sim cards and an SD card at a moment.

Sensors : Its is having all sensors for a device available at this price point like fingerprint, Proximity ,Light sensor with an additional IR blaster which allows you to use your phone as a remote for all devices having an IR receiver
Dimensions

Height: 149.33mm
Width: 71.68mm 
Thickness: 8.75mm
Weight: 178g


Network and connectivity:

Network bands
GSM B2/3/5/8 
WCDMA B1/2/5/8 
FDD-LTE B1/3/5
TD-LTE B40/41(2535-2655MHz)

Wireless 
802.11 a/b/g/n
Bluetooth 4.2
WiFi Direct,WiFi Display
WiFi 2.4G, WiFi 5G

Cons of this device:

I am writing about its cons after using it for 2 months so I can give its cons than anyone else. Front Cam of this device is only 5MP it is a bit lower when compared to other phones at this price point. It is also having some heating issue while charging.While gaming with phone its emits some heat which is avg with its massive 4000mAh battery. Also there are some lags in multitasking with this device. I found that its chin is very larger when compared to others.

The final verdict:

I recommend Redmi 6 Pro if you are looking for a good phone in 11k price segment. It is one of the the best mid rangers coming out with MIUI.
If u want a massive battery,MIUI,A notch design, Dual camera setup, Fast and responsive Fingerprint sensor and an IR blaster then go for it.

Sample Shots with its camera :

image shot on redmi 6 pro,MI A2 Lite

image shot on redmi 6 pro,MI A2 Lite

image shot on redmi 6 pro,MI A2 Lite

image shot on redmi 6 pro,MI A2 Lite

image shot on redmi 6 pro,MI A2 Lite

image shot on redmi 6 pro,MI A2 Lite

image shot on redmi 6 pro,MI A2 Lite


BUY NOW THROUGH AMAZON: https://amzn.to/2GOtFee

0 comments:

How to create your own apps for free just by using a website

December 22, 2018 Evil Kannevil 0 Comments


You heard it right guys you can now make a free app just using a website. You don't need to have any knowledge in coding or programming. Just got this website https://www.appsgeyser.com/ amd follow my steps it has a very simple UI which helps to make an app within just five minutes. I don't want to waste your time so let's go directly into the topic.

  • First go to this website by using the link given above.


  • And you will get an interface like this.
  •  You can create many kinds of apps using this website. For example I am going to create a blog app.
  • Click on next.
  • Enter app name, give its link ,add a description and click next. 
  • Now click on custom Icon upload an icon crop it and click on next.

  • Now they will ask you to register just sign up with your google or facebook account. 
  • Now you will be taken to a screen like this your app is ready to be downloaded.
  • Scroll down you can either download it by scanning the QR code clicking its link.
  • Now it's time to install the app.
  • It's amazing guys see more screenshots below

  • Check out the app which i created by clicking this Link


0 comments:

How to setup domain names from freenom on your blogger blog

September 29, 2018 Evil Kannevil 0 Comments

Freenom free domain name

Hey guys recently I publish an article HOW TO GET FREE DOMAIN NAMES FOR YOUR WEBSITES and in that article i showed you how to buy a free domain name but after buying it you must install it on your website. So in this article I am showing you how to properly install a custom domain name from freenome on your blogger blog. I have explained all the steps in this article very clearly using screenshots such that even non techy guys can simply understand.

Please note: You must be patient while setting this because many error can occur!! 

Now just follow my steps

Freenom free domain name
  • Now your domains will be listed below from it click the manage domain option 
Then click on sign up as developer option.Sign up as usual

  • Now you will see a number option from it click on the manage freenom DNS option
Then click on sign up as developer option.Sign up as usual

Now the next step is important
  • click on the + more record option from your window and enter the following address under target option.
  • 216.239.32.21
    216.239.34.21
    216.239.36.21
    216.239.38.21
  • Select type A      
  • Do not enter anything under the name
Check this image to know that if you entered it on the correct place
  • Do not close it. after opening a new tab go to your blogger account and under your blog address click on the +Setup up a third party URL for your blog option  
freenome free domain name blogger

  • Now enter your freenom domain name and click on the save button 
  • At first you will see an error message like this↓↓ But don't worry
  • Now go back to freenom and click + add more record select type CNAME and under the target copy and paste the Name,Label shown in the error window in blogger and destination target shown there and click save changes.
  • This is an important step as on this step google verifies your authority
freenome free domain name blogger
You must do like this
  • Now wait for few minutes usually it takes 5-7 minutes 
  • Now go back to your blogger account and enter your domain name and select the redirect option this time you will not receive any error messages.
freenome free domain name blogger
  • Now under HTTPS turn on HTTPS redirection.
freenome free domain name blogger

That's it you have successfully completed the process any error occurred please comment below 

0 comments:

How to get free domain names for your websites

September 27, 2018 Evil Kannevil 0 Comments


Usually domain names are not free,there are many websites like godaddy.com from where you can buy a domain names.But here in this article i will show you how to buy domain names for free of costs.

If you are a using google's blogger then you will definitely need this because by default you are getting a domain name starting with .blogspot.com and you your domain name will not start with www.

Now here is the solution using freenom you can get a domain names starting with www and ending with .tk, .ml, .ga etc. Just follow my instructions ⇓


  • Now go to services and select register a new domain.

  • Type your desired domain name without extensions and click check availability button.
  • Now you will see a number of extensions marked under free and click get it now for your desired extension

  • click get it now for your desired extension and now select checkout

  • Now select 12 months @ free option and click the continue button.After 12 months are over can buy another domain name for free using this method.
  • Now enter your details and click checkout.

  • Then the next window you can see an order confirmation dialogue box and your domain name registration is complete.


That's all guys now go and install your new domain name for your website
I will soon made another article regarding how to install this on your website.
hope this was an useful article if yes comment below.

0 comments:

How to add custom theme to your blogger blog

September 23, 2018 Evil Kannevil 0 Comments


Hey guys I am back after a short break to blogging.This time i am bringing a blogging tip "How to add custom theme to your blogger blog".Although blogger is having some pre-installed blogger theme we may get bored after using it for some time and unlike wordpress blogger is only having a couple of themes to change with.

But now here is a solution you can now change your blog's theme from a ocean of selections by simply downloading some html codes and installing it on your site. Now follow my steps.↧↧

  • First go to any of the following sites(Many alternate site links are provided below)

  • Now select a theme after previewing and click the download button.

  • Now a zip or a Rar file will be downloaded so extract it first.

  • After extracting it you may find a number of files from which find the xml file

  • Now open your blogger and go to your theme tab and select the backup and restore option
  • A popup window appear(First click the download theme option from here if you don't have a backup for your site)

  • Now click the choose file button and select the xml file which you have downloaded and click the upload button.
  • Wait for a few seconds and your new theme is installed on your blog.

  • Now go to your layouts tab and spend some time to arrange your site according to your need.
  • If you are having some knowledge about coding you can directly edit your xml code.

That's all with some simple steps you can now edit your blogger blogs theme from the tons of themes that are available online. Enjoy 👊👊

0 comments:

Earn money by blogging without adsense approval

July 21, 2018 Evil Kannevil 0 Comments


You heard it right you can start earning money from your blog the next second without waiting for any kind of approvals like adsense. It's too hard to get an adsense approval then why still running behind it if you have an easy method for monetizing your blog. We are going to use Ayboll for displaying ads on our page instead of adsense. Its works on pay per click the more users click on your ads the  more money you will earn

Just follow this steps


  •  Then provide your email id and a password for your account.


  • After completing your sign up you will reach a page like this ↧↧↧
  • Now click on my widgets under the publish tab. 


  • Now click on the create widget button

  • Now select the type of layout which most suits your site


  • Customize it so that it can easily blend on your site.
  • Scroll to the bottom of the site and click the get code butoon.
  • Now copy and paste your code to your website under the head tag.

  • If your code is correctly installed can see its status in green color as active.

  • Just go to your site it has already begin to show ads and you will earn according to the users click in those ads.
Hope! You find this article useful if you face any difficulties don't forget to tell us.

0 comments: